8 inch Ritchey-Chretien

The Bolton Group


The Ritchey-Chretien (RC)Cassegrain design of telescope is the one invariably chosen for most of the World's professional telescopes - including the Hubble Space Telescope. On axis it is perfect as the ray trace shows. Off axis it is corrected for coma - the bain of amateur reflecting telescopes but it does suffer from some astigmatism. Often erroneously referred to as flat field it's field curvature is actually greatest of the cassegrains but this largely depends on the secondary magnification factor - the smaller this is the less field curvature results.

Recently a prominent maker of Schmidt-Cassegrains introduced a coma corrected Schmidt-Cassegrain and called it an "Advanced Rictchey-Chretien". Clearly it is not - making a telescope corrected for coma doesn't make it an RC. A telescope with a Schmidt corrector is a Schmidt - a coma corrected Maksutov (Rumak) is not an RC so neither is a Schmidt.


Testing the secondary with a Hindle Sphere - note central perforation
The ronchi screen and light source is behind the screen on the right

Introduction

The design is based on that of Rutten and van Venrooj see Telescope Optics, page 65. The specifications are:-

Primary: 200mm f/3 Hyperboloid
Secondary: 65mm Hyperboloid
Amplification: 2.667
Cassegrain focus: 1600mm (f/8)

Before the optics themselves can be a made an 8 inch f/1.5 test sphere was required for testing the secondary - known as a Hindle Sphere. Once Brian had produced this the secondary itself could be started.


Brian hand figuring the secondary


The star lap used for aspherising the secondary

Secondary Mirror

The secondary mirror is of course convex and is only 65 mm in diameter. One might assume that a small mirror is easier than a large one but as the size drops under about 4 inches they become harder. That taken with the severe aspherising needed makes this one of the most difficult optical tasks a mirror maker can attempt.

The mirror was easy to take to a sphere but it was the taking it to the correct hyperboloid that was tricky. The mirror needs to be taken down at the 70% zone to go from sphere to hyperbola. In the end Brian used a star lap and longer strokes than normally advised. This produced a much smoother figure. Eccentric fingure pressure on the tool, as advocated by Texerean, helped the process.

The testing using the Hindle Sphere is a double pass so errors are doubled in magnitude. Despite this the mirror finally produced straight ronchi bands with just a touch of minor fluctuation, indicating accuracy around 1/10 wave.


Diamond generator for hogging out mirrors - the blue is the angled cutter
Primary Mirror

The primary mirror at f/3 required a lot of glass to be removed to reach the correct depth. Even with a grinding machine this is laborious to say the least. To get over this problem Brian built a diamond generator. This can hog out deep mirrors in half an hour! It consists of a rotating table and rotating cutter. The cutter is a cylinder with the edge coated in industrial diamonds. How it works takes a bit of understanding. The cutter is angled with one edge aligned with the mirror centre. You would think that this would produce a vee cutout but it in fact produces a sphere. The angle of the cutter determines the radius of curvature. The whole operation has to flooded in water and the glass just disappears!


Primary after partial coring of the central hole

Having got the correct curve the next step would normally be fine grinding. However before that stage the mirror required coring. This is done from the back and does not go completely through at this stage but stops about 3mm short. The core was cut with diamond edged cylinder using Gerald's milling machine. The cut was then sealed with pitch. Only when final figuring is finished will the core be finally cut through, and this time from the front.

Testing the primary (left) in autocollimation with full sized flat (right)


Primary aluminised and in its cell

The strategy adopted for polishing was first to a sphere - then to a parabola and finally to the hyperbola. Initial polishing to a sphere was with a full size tool. At f/3 a sphere is very hard to resist. The next stage was taking it to a parabola. For this Brian used a 4 inch tool. At f/3 a parabola is a lot deeper than a sphere and only a half size tool can achieve this and with a petal shaped lap. The parabola was tested in autocollimation with a full size flat, which has to have a hole in it. This Brian got to beautifully straight Ronchi lines indicating a near perfect parabola - unfortunately only an intermediate stage. How to get to the final hyperbola was a puzzle, at f/3 the Ross or Dall null tests are impossible so a different method had to be found. A parabola has an eccentricity of -1 whereas the hyperbola required was -1.15. By testing in autocollimation with the flat again it was a question of figuring for the extra -0.15 (or in fact -0.3 because of the double pass) as if it were a parabola. This Brian achieved. The final test will be when the telescope is assembled and the whole is tested including the secondary in autocollimation. To do this the telescope tube assembly needs to be constructed.

focusing secondary - note the primary cone baffle and wire tensioners


Tube assembly with electric focuser


Nearly finished! Note the worm drive

The construction of the tube assembly is now well underway. 
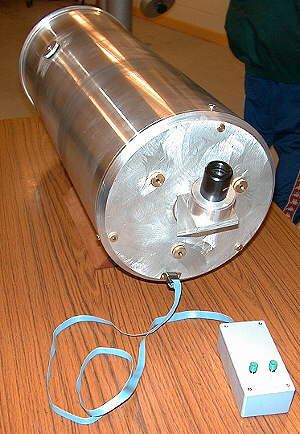
A 10 inch diameter extruded aluminium tube was located in a scrap yard. It was a bit too thick so Brian turned it down to just under a 3mm thick wall. Plenty strong enough. 
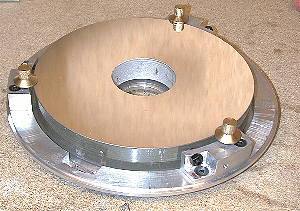
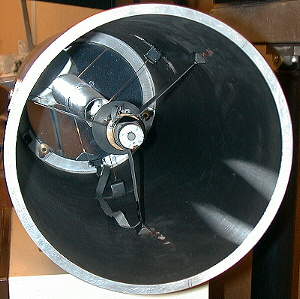
The back plate is fairly simple as the secondary will move for focusing. It was machined to fit and a bevel put - similar to how Celestron finish their tubes.

The seconary spider is three-vaned and as well as the mirror it caries the 12 volt intrument motor for moving it back and forward for focusing.

Unusually Brian went for a 110 degree diagonal making the flat mirror specially. This angle means the viewing position is more comfortable and provides more clearance away from the back plate. The focuser hand control unit is very simple with forward and back buttons. There are tiny limit switches at each end of the secondary's travel which disengage the appropriate button on the hand control to prevent overshoot and damage.

Initial testing showed a good image but indicated how essential baffles were. These are currently being fitted to both the primary (a cone through the central hole) and the secondary (a stubby expanding cone around its edge). The best shape for the primary baffle is a tapering cone. However commercial cassegrains that utilise primary focusing are unable have this optimum shape as the mirror has to slide backwards and forwards. No professional telescope does that! Again borrowed from professional 'scopes the baffle is located by wire tensioners. Once the primary baffle was in place effectiveness of baffling could be checked by looking through from both the front and back. This indicated that a small front baffle (again cone shaped) was necessary.

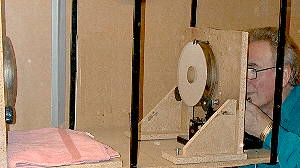
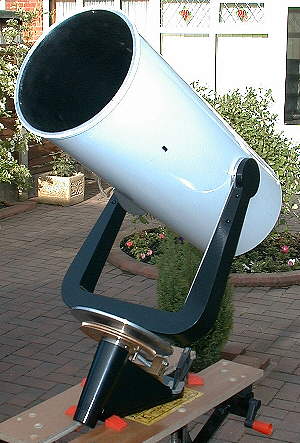
The mount was the next job and this is in its early days. A very compact mount similar to Russell Porter's ideal tapering shape has been fabricated. It includes a high precision bronze wormwheel machined by Brian. The telescope is substantially complete now with minor jobs such as lining both the tube and baffle still to do. A pillar is currently being fabricated.
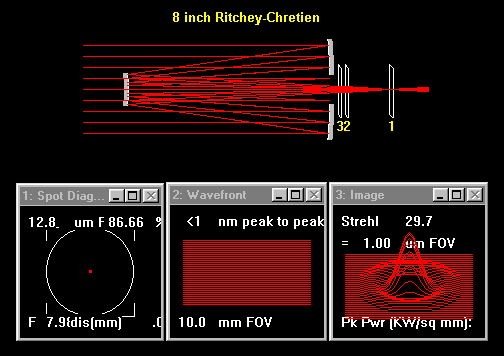
Conclusion

The telescope proved very difficult to get a perfect image. After much trying it was eventually dismantled and the parts used for another project. One of the problems is there is so little information available on RCs so attempting one is a major task and shouldn't be undertaken lightly.


Return to Telescope Making main menu